COD BO7 Multiplayer Map Guide
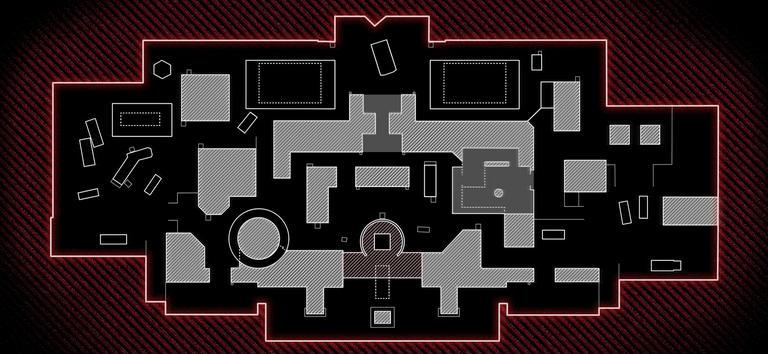
Most of the action takes place outside, the Control Room being the only accessible interior space on the map. Navigate three well-defined lanes of combat interspersed with the facility’s various components, the high walls providing strong cover and flanking opportunities throughout. Agile Operators might try their luck accessing the rotating Guild crate, a good power position for those who can safely make it inside.
Sights up: Exposure is littered with structures without windows or other means to spot enemy movement on the other side. Get the jump on targets by aiming down the sight as you turn corners, especially near objectives and enemy spawns.
Clear the air: An advantage of the map’s labyrinthine layout is that it’s not difficult to secure a safe area from which you can launch attacks against enemy aerial streaks. Keep the skies clear and shut down their advantage.
Keep ‘em on edge: Equip the Echo Unit Field Upgrade to deploy a holographic soldier around corners, setting foes on edge as they begin to question what’s real or not. Pair it with the Gearhead and Charge Link Perks plus the Operative Hybrid Combat Specialty to increase its number of uses in the match.
Advanced Map Tips
Tower Climb — Alpha (A)
A modular white container labeled "GUILD" is suspended by cables and being lowered into position within a futuristic solar research facility. The site features mechanical air units, exposed piping, and a landscape dominated by orange dirt and hexagonal solar panels.
Reaching the inside of the Guild crate requires timing and agility. Use the walls circling the Tower to help guide your way in. Fight enemies from within the crate or wait for the right moment to jump toward the yellow ladder giving access to the Tower platform.
Power of Three — Beta (B)
A futuristic industrial facility marked "HELIOS HIVE" shows a large cylindrical structure at the center with mechanical arms and containers suspended by cables; solar panel arrays and smoke plumes are visible in the distance.
The upper Control Room window, Tower platform, and the Salt Storage walkway all line up inciting a battle across the map’s three major power positions, with a fourth in the mix if you count the Guild crate. When fighting from one of these areas, keep an eye on the others to prolong your life and to keep the enemy away from the useful vantage points.
Renewable Cover — Gamma (Γ)
A futuristic desert-based solar research facility is shown with modular white GUILD containers, a blue cargo van, and black smoke rising in the background. The area is lined with hexagonal solar reflectors, metal infrastructure, and drone activity overhead.
The solar panel lying across the parked truck in Loading offers a natural cover point that’s perfect for defending the location. Its length defends you from incoming enemies across all three lanes and its height helps you keep tabs on targets in the immediate area.
For more information, please visit U4GM. In addition, we offers safe and cheap BO7 Bot Lobbies for sale that can help you fast unlock XP, Weapons & Camo with Ease!